
Create an NFT Project with AI
Create art with MidJourney + Smart Contract with Thirdweb + Website with Makeswift


Learn how to create a full NFT project with artwork created by AI, a smart contract created with Thirdweb, and a minting website created with Makeswift. No technical coding will be needed to create the project in this guide.
NFT projects are more than just creating an NFT to sell. This guide was created to showcase these tools and how they can make the building easy allowing the project more time to create value and utility for holders.
Artwork with MidJourney
Let’s first create some artwork for our NFT using an AI image generator called MidJourney.
MidJourney is free to start with where you get about 0.4 hours of AI generation. There are paid versions that give you more hours and unlimited slower generations as well. If you’re interested in MidJourney’s plans you can check them out here.
How does MidJourney work?
MidJourney works within Discord (create a Discord account if you don’t already have one). If you have a paid plan you can invite the MidJourney bot into your own server and generate images within that server. If you don’t have a paid plan you will have to generate your images in MidJourney’s server along with people who are doing the same.
To generate an image start with /imagine followed by a prompt for the image you want to generate.
"a portrait of an anime character"
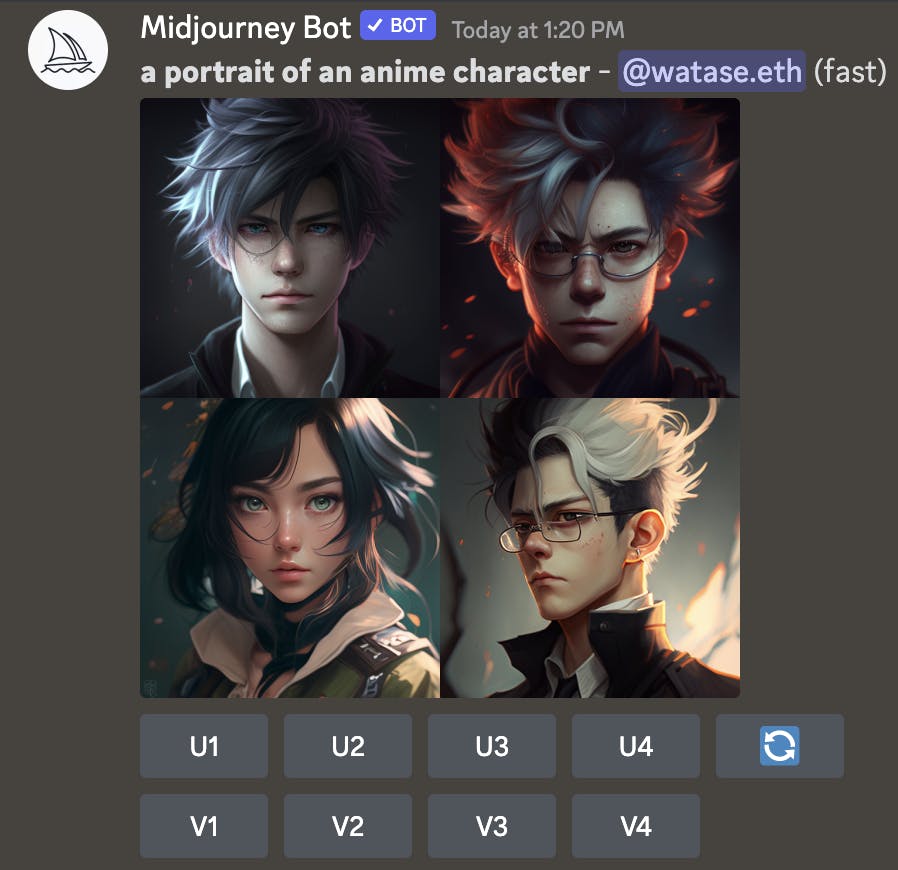
MidJourney will generate 4 images (this may vary depending on the prompts used) that are lower quality. You'll then have the option of U or V
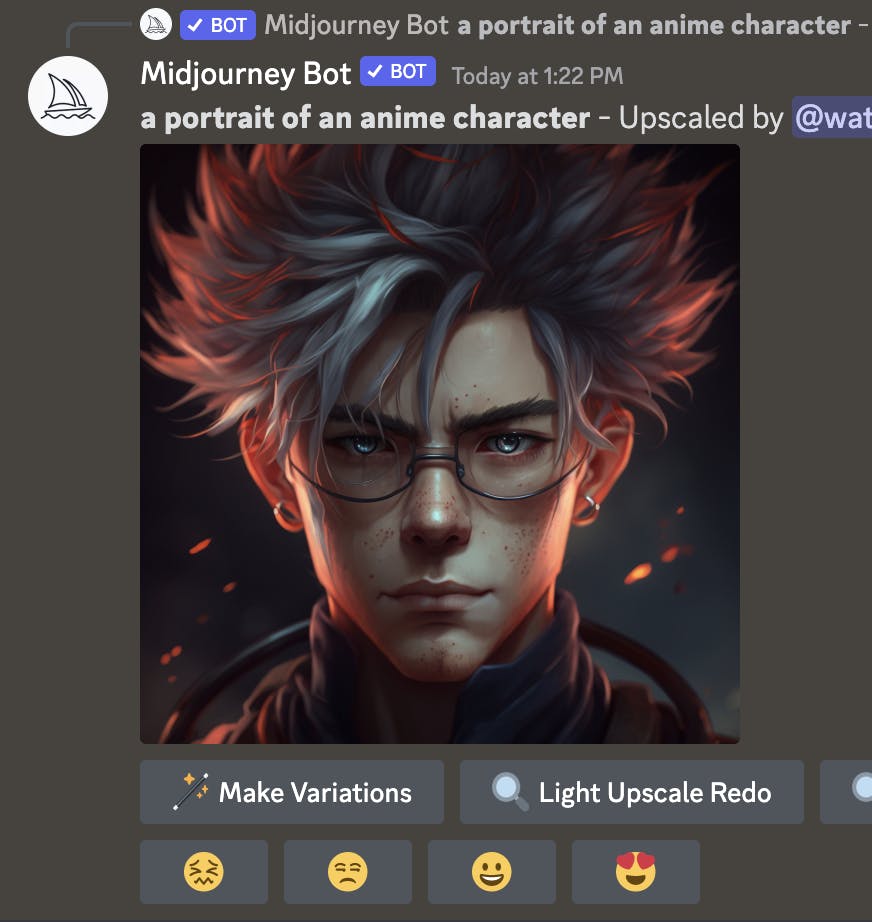
Uwill upscale that selected image and add more details and give you a higher quality result
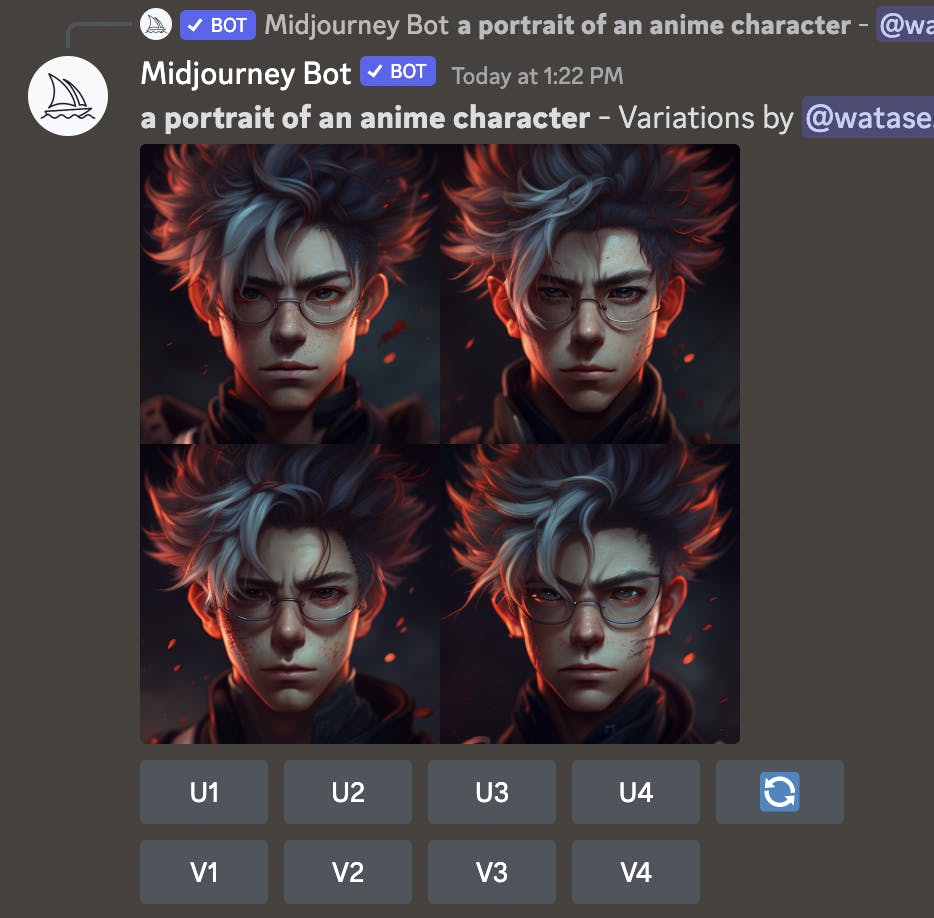
Vwill give you a variation of the selected image and give you slight variants of the image
Creating NFT artwork:
For our NFTs we’re going to create some anime themed PFPs. We want them all facing to the right and tech themed.
Here are some of the results of the NFTs I created:
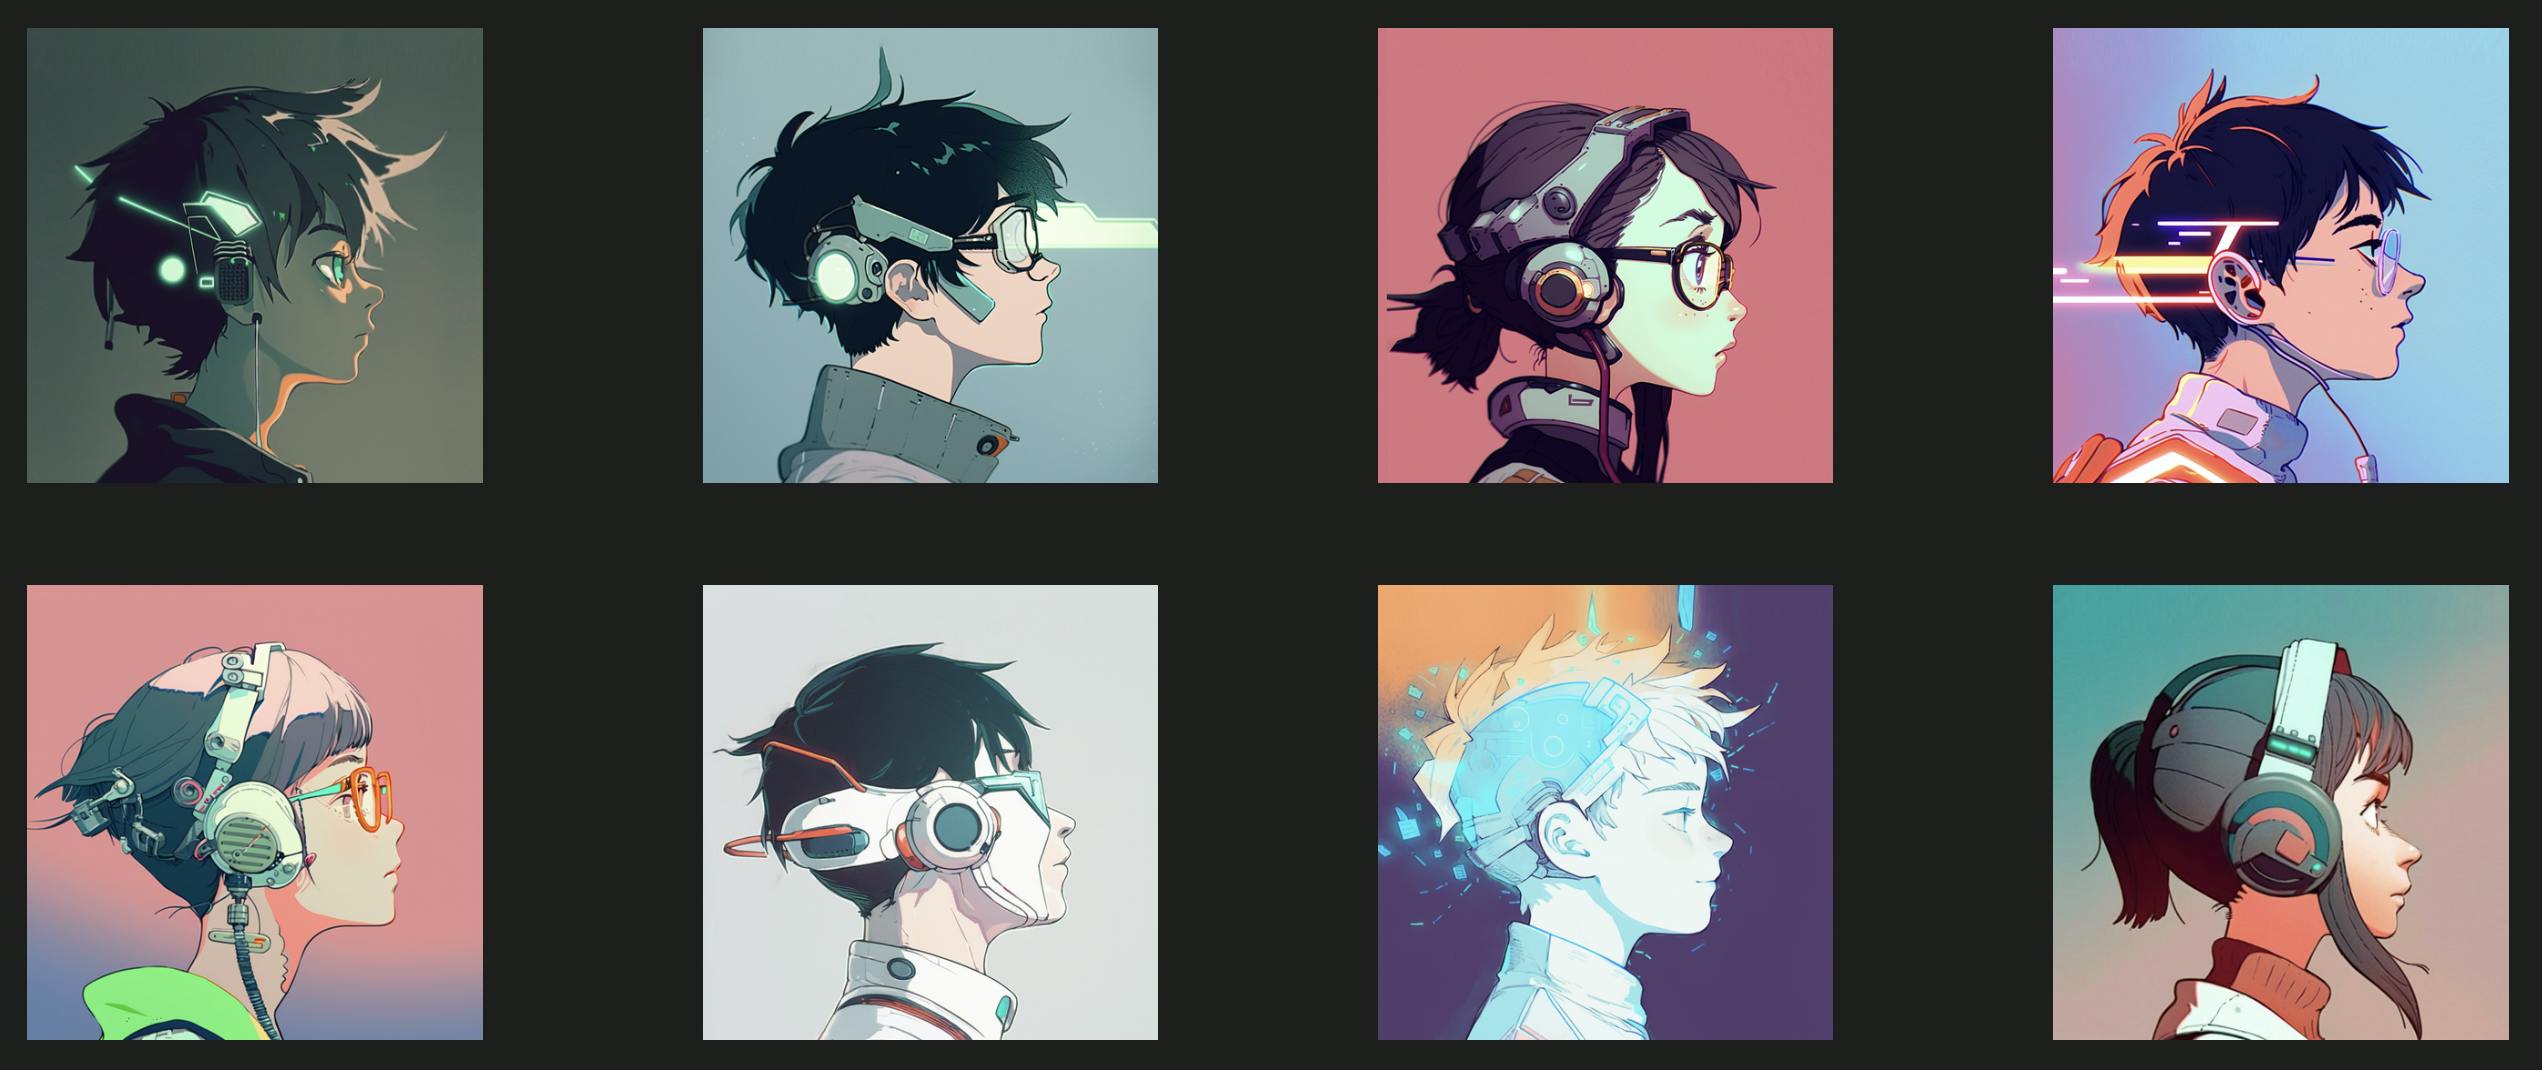
Keep in mind that they don’t need to be perfect and you can throw them into an editor, like Photoshop, to fix them up a bit.
Tips for generating art:
Name an artist - To keep the artwork as consistent as possible make sure to add the artist you want the image to be done by.
Be specific - If you know what attributes or details you want in your image use commas to add them to your prompt
Use variation - If a result is close but not perfect, generate variations to get closer to what you are looking for
Re-organize your prompt - Sometimes the AI may not interpret the prompt as you would like. Try rearranging the prompt to see if it gets the results you want.
Finishing touches:
Not all the results came out facing the right and the sizing of the characters varied from image to image. I threw the images into Photoshop and flipped them all to be facing right and adjusted the sizing and positioning so they were consistent.
Smart Contract with Thirdweb
Now let’s create the smart contract for our NFTs. We’ll be using Thirdweb’s pre-built contracts and their dashboard to go ahead and deploy our NFT smart contract.
Head on over to Thirdweb’s website and connect your wallet
Select “+ Deploy New Contract”
Search and find “NFT Drop”
This contract is an ERC-721A and will allow us to lazy-mint our collection and allow other wallets to claim these NFT for a price.
Select “Deploy Now”
Choose an image for your collection
Give your collection a name
Give a token symbol
Add a description of your collection
Set your payout wallet address for initial mint and royalties for secondary sales
Choose your chain to deploy on (I’m going to use Polygon for this project)
Select “Deploy” and confirm the transaction in your wallet
Once the contract has been deployed you will be re-directed to the contract’s dashboard
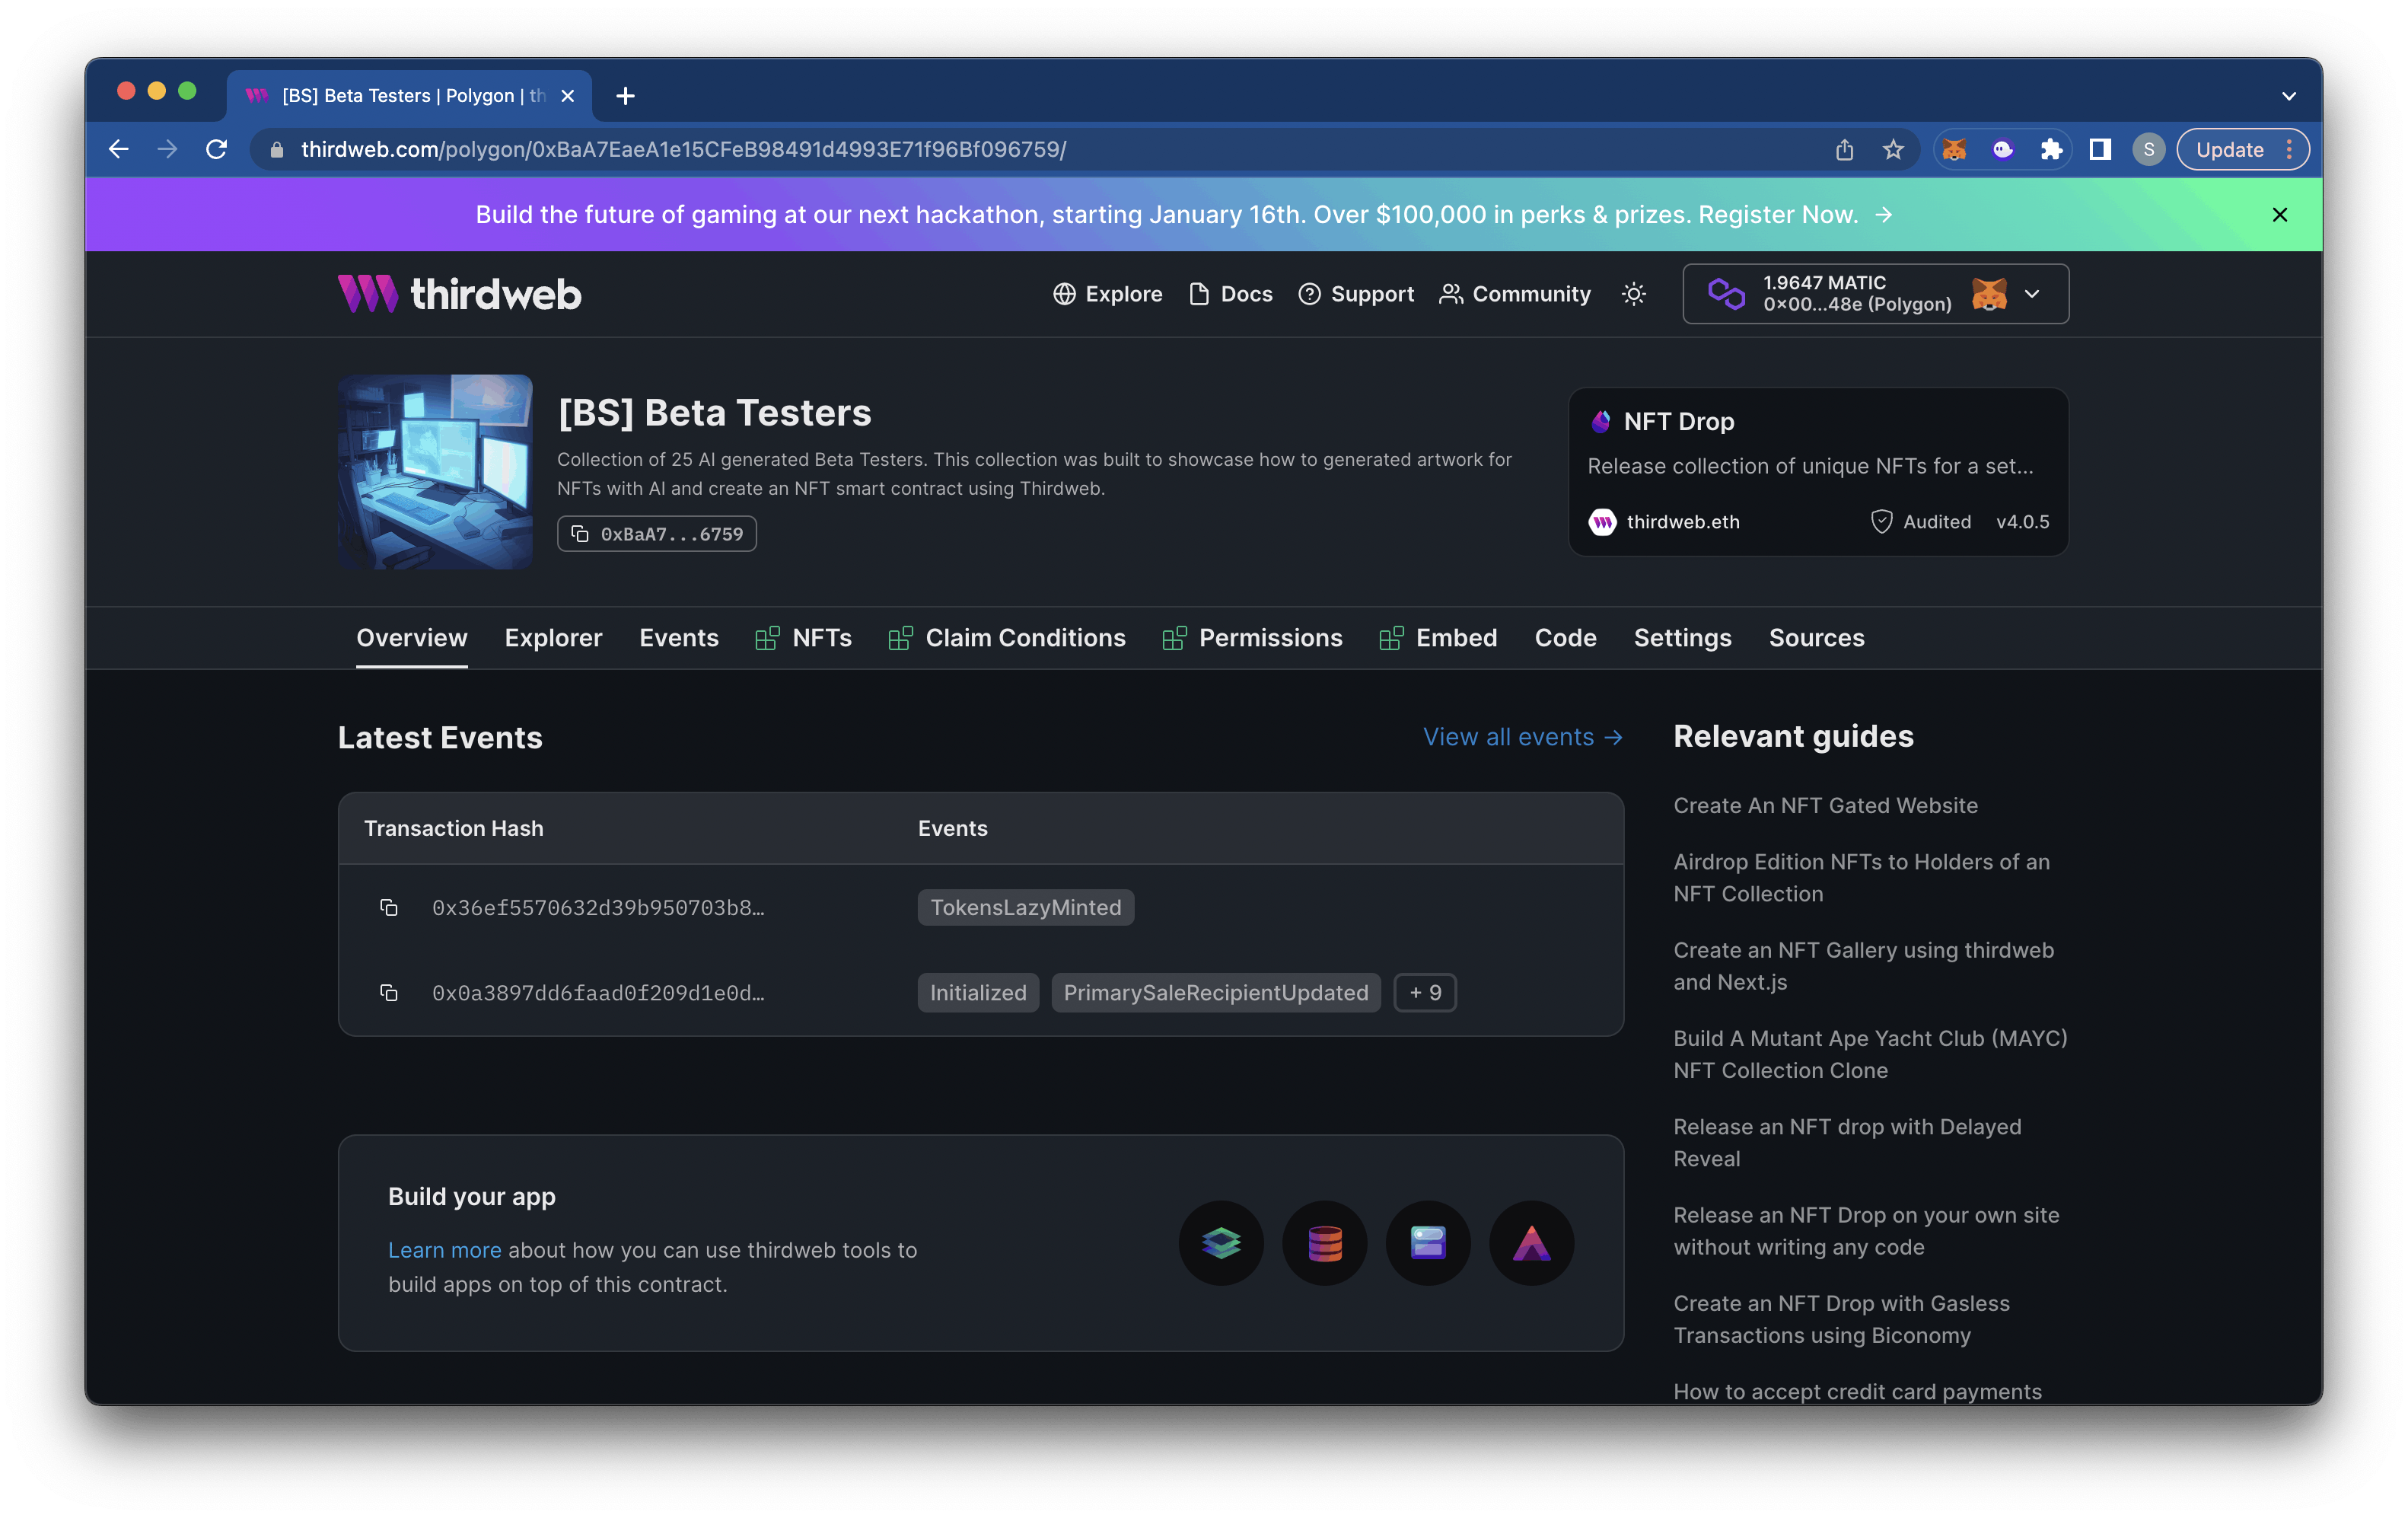
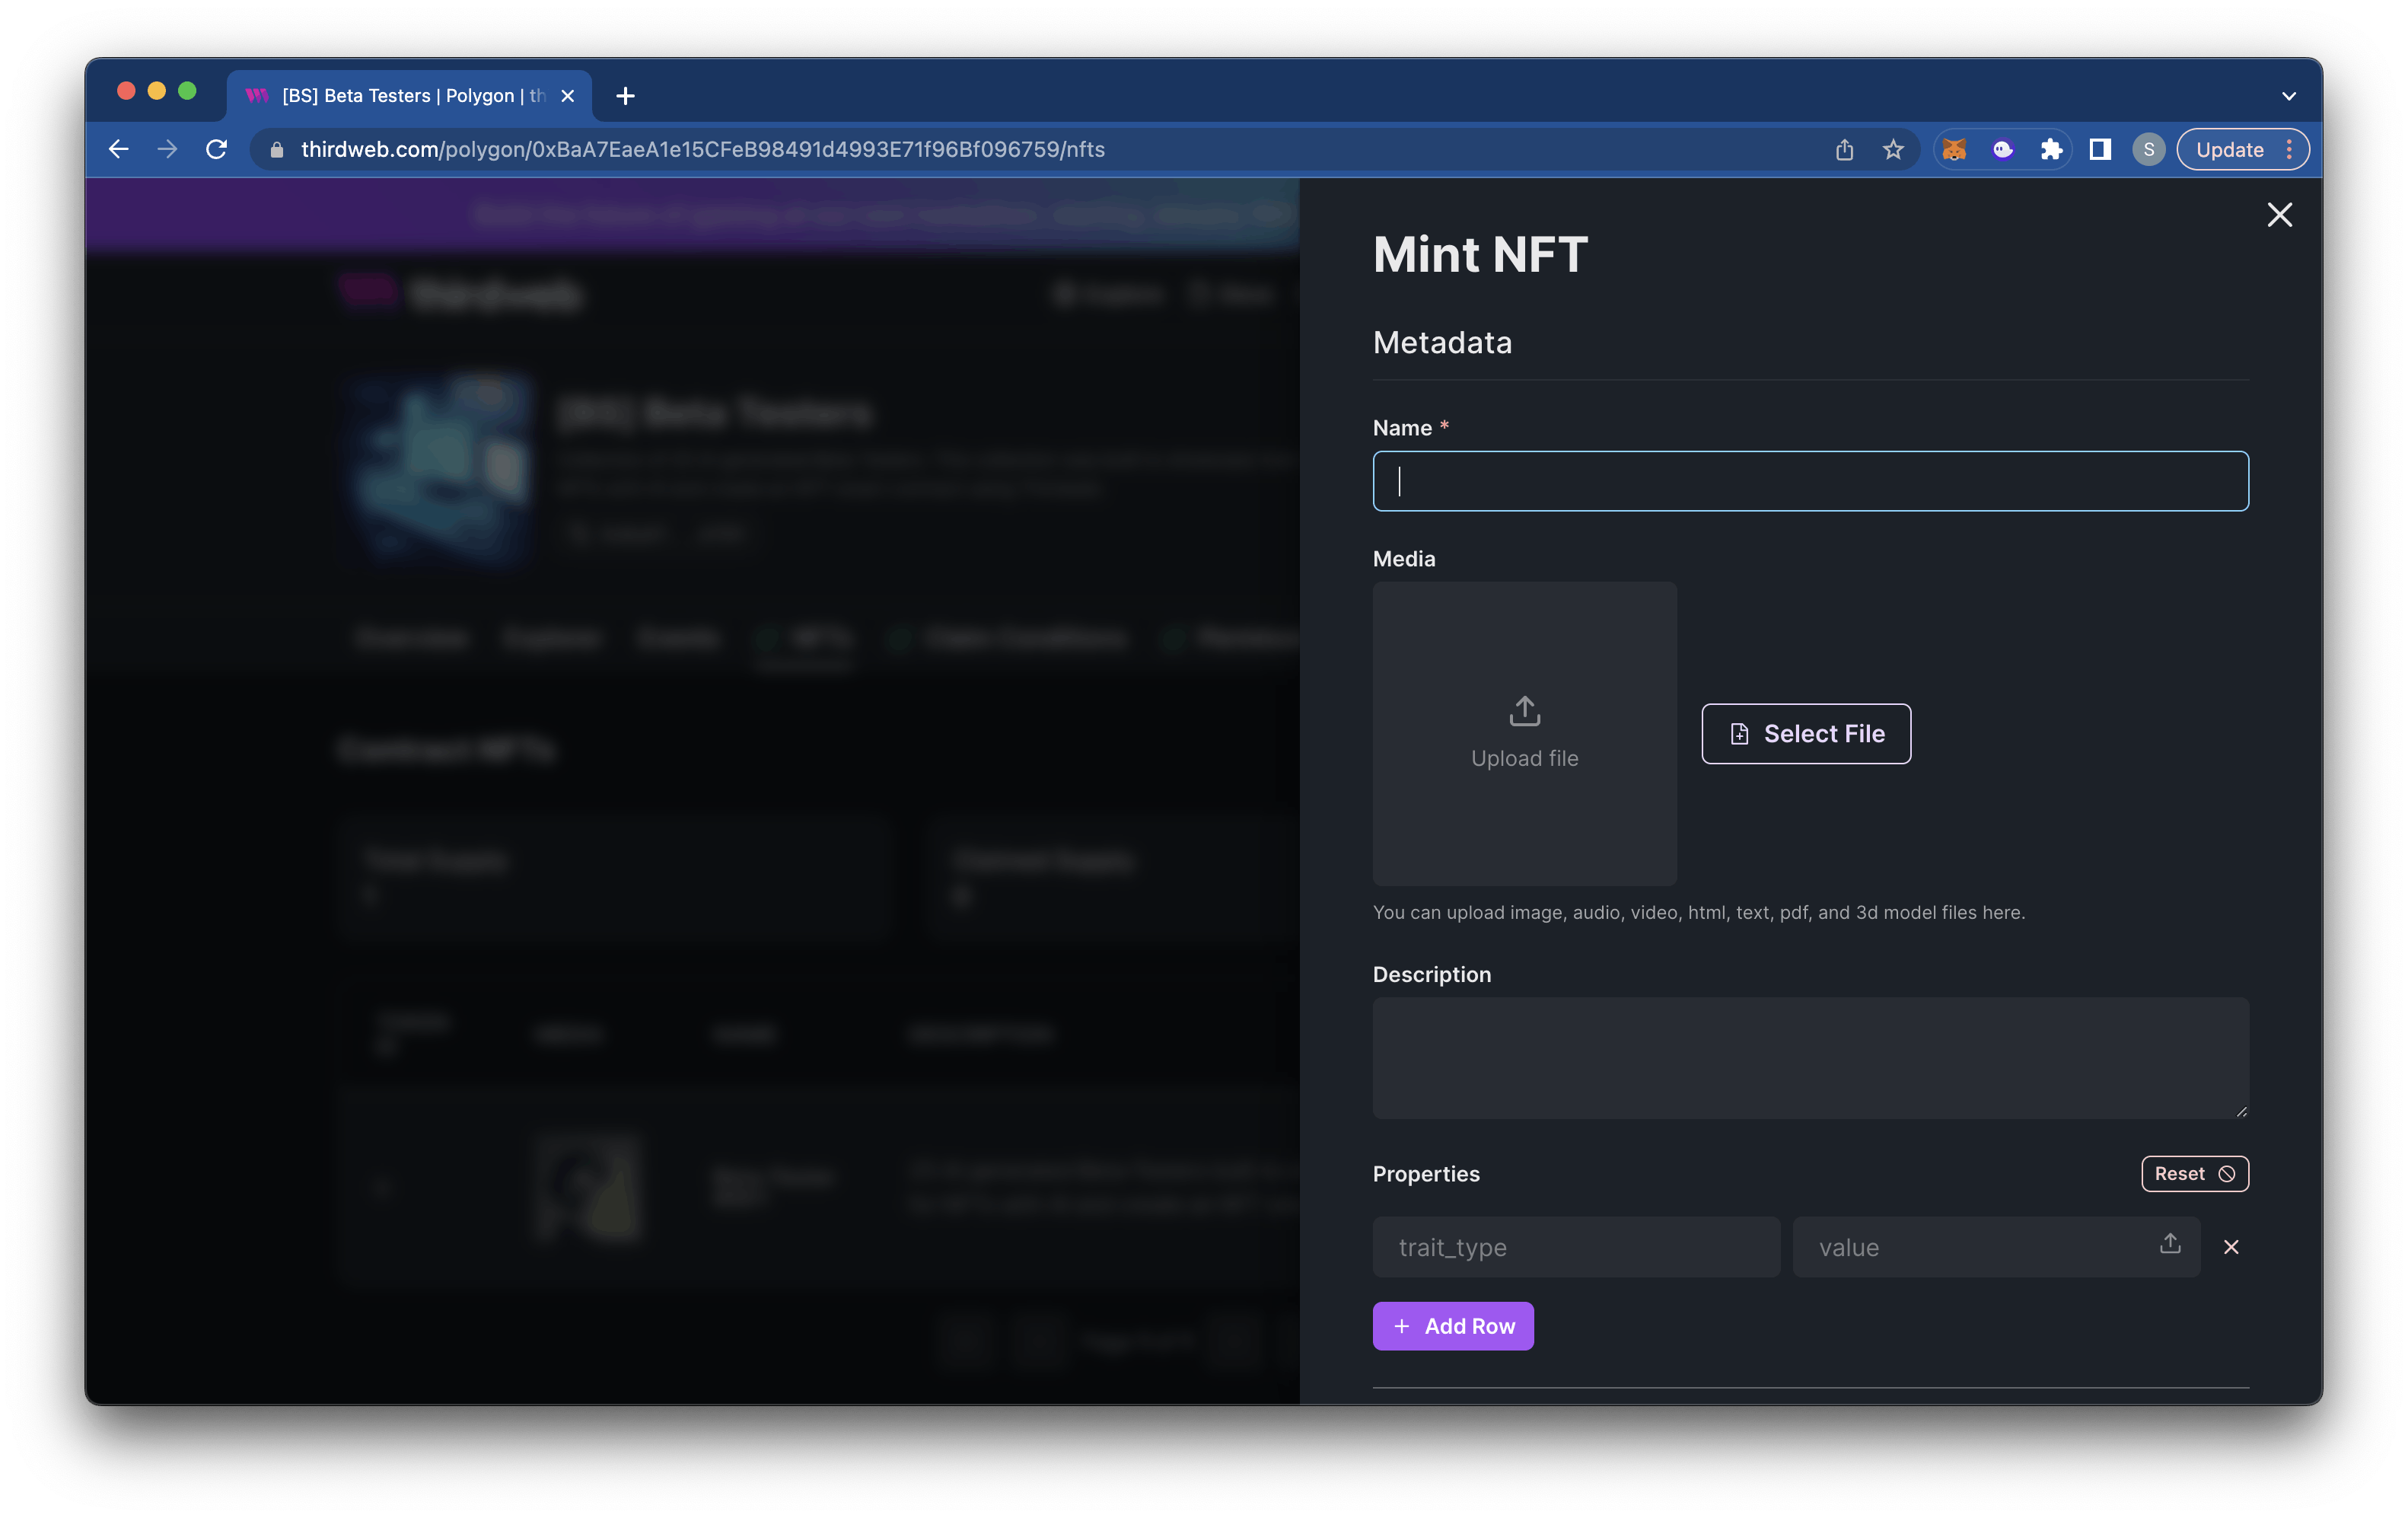
Go to the “NFTs” tab
Now we can
Lazy Mintour NFTsLazy Mintis a way of minting our NFTs to the smart contract instead of a wallet. When a user claims a NFT from our minting site they will be the first owners of the NFT instead of our wallet.Two ways to Lazy Mint our NFTs:
First we can upload our images to IPFS and create our metadata for each NFT that references those images. You can then select “Batch Upload” and upload all your metadata at once.
Second (this is the method I will use) we can use the “Single Upload” option and give each NFT a name, image, and description. Once everything is filled out, double check and make sure everything is correct since this will be set on-chain. Then select “Lazy Mint NFT” and complete the transaction in your wallet.
(If you have a large amount of NFTs in your collection I would suggest doing the first method and ‘Batch Upload’ your metadata)
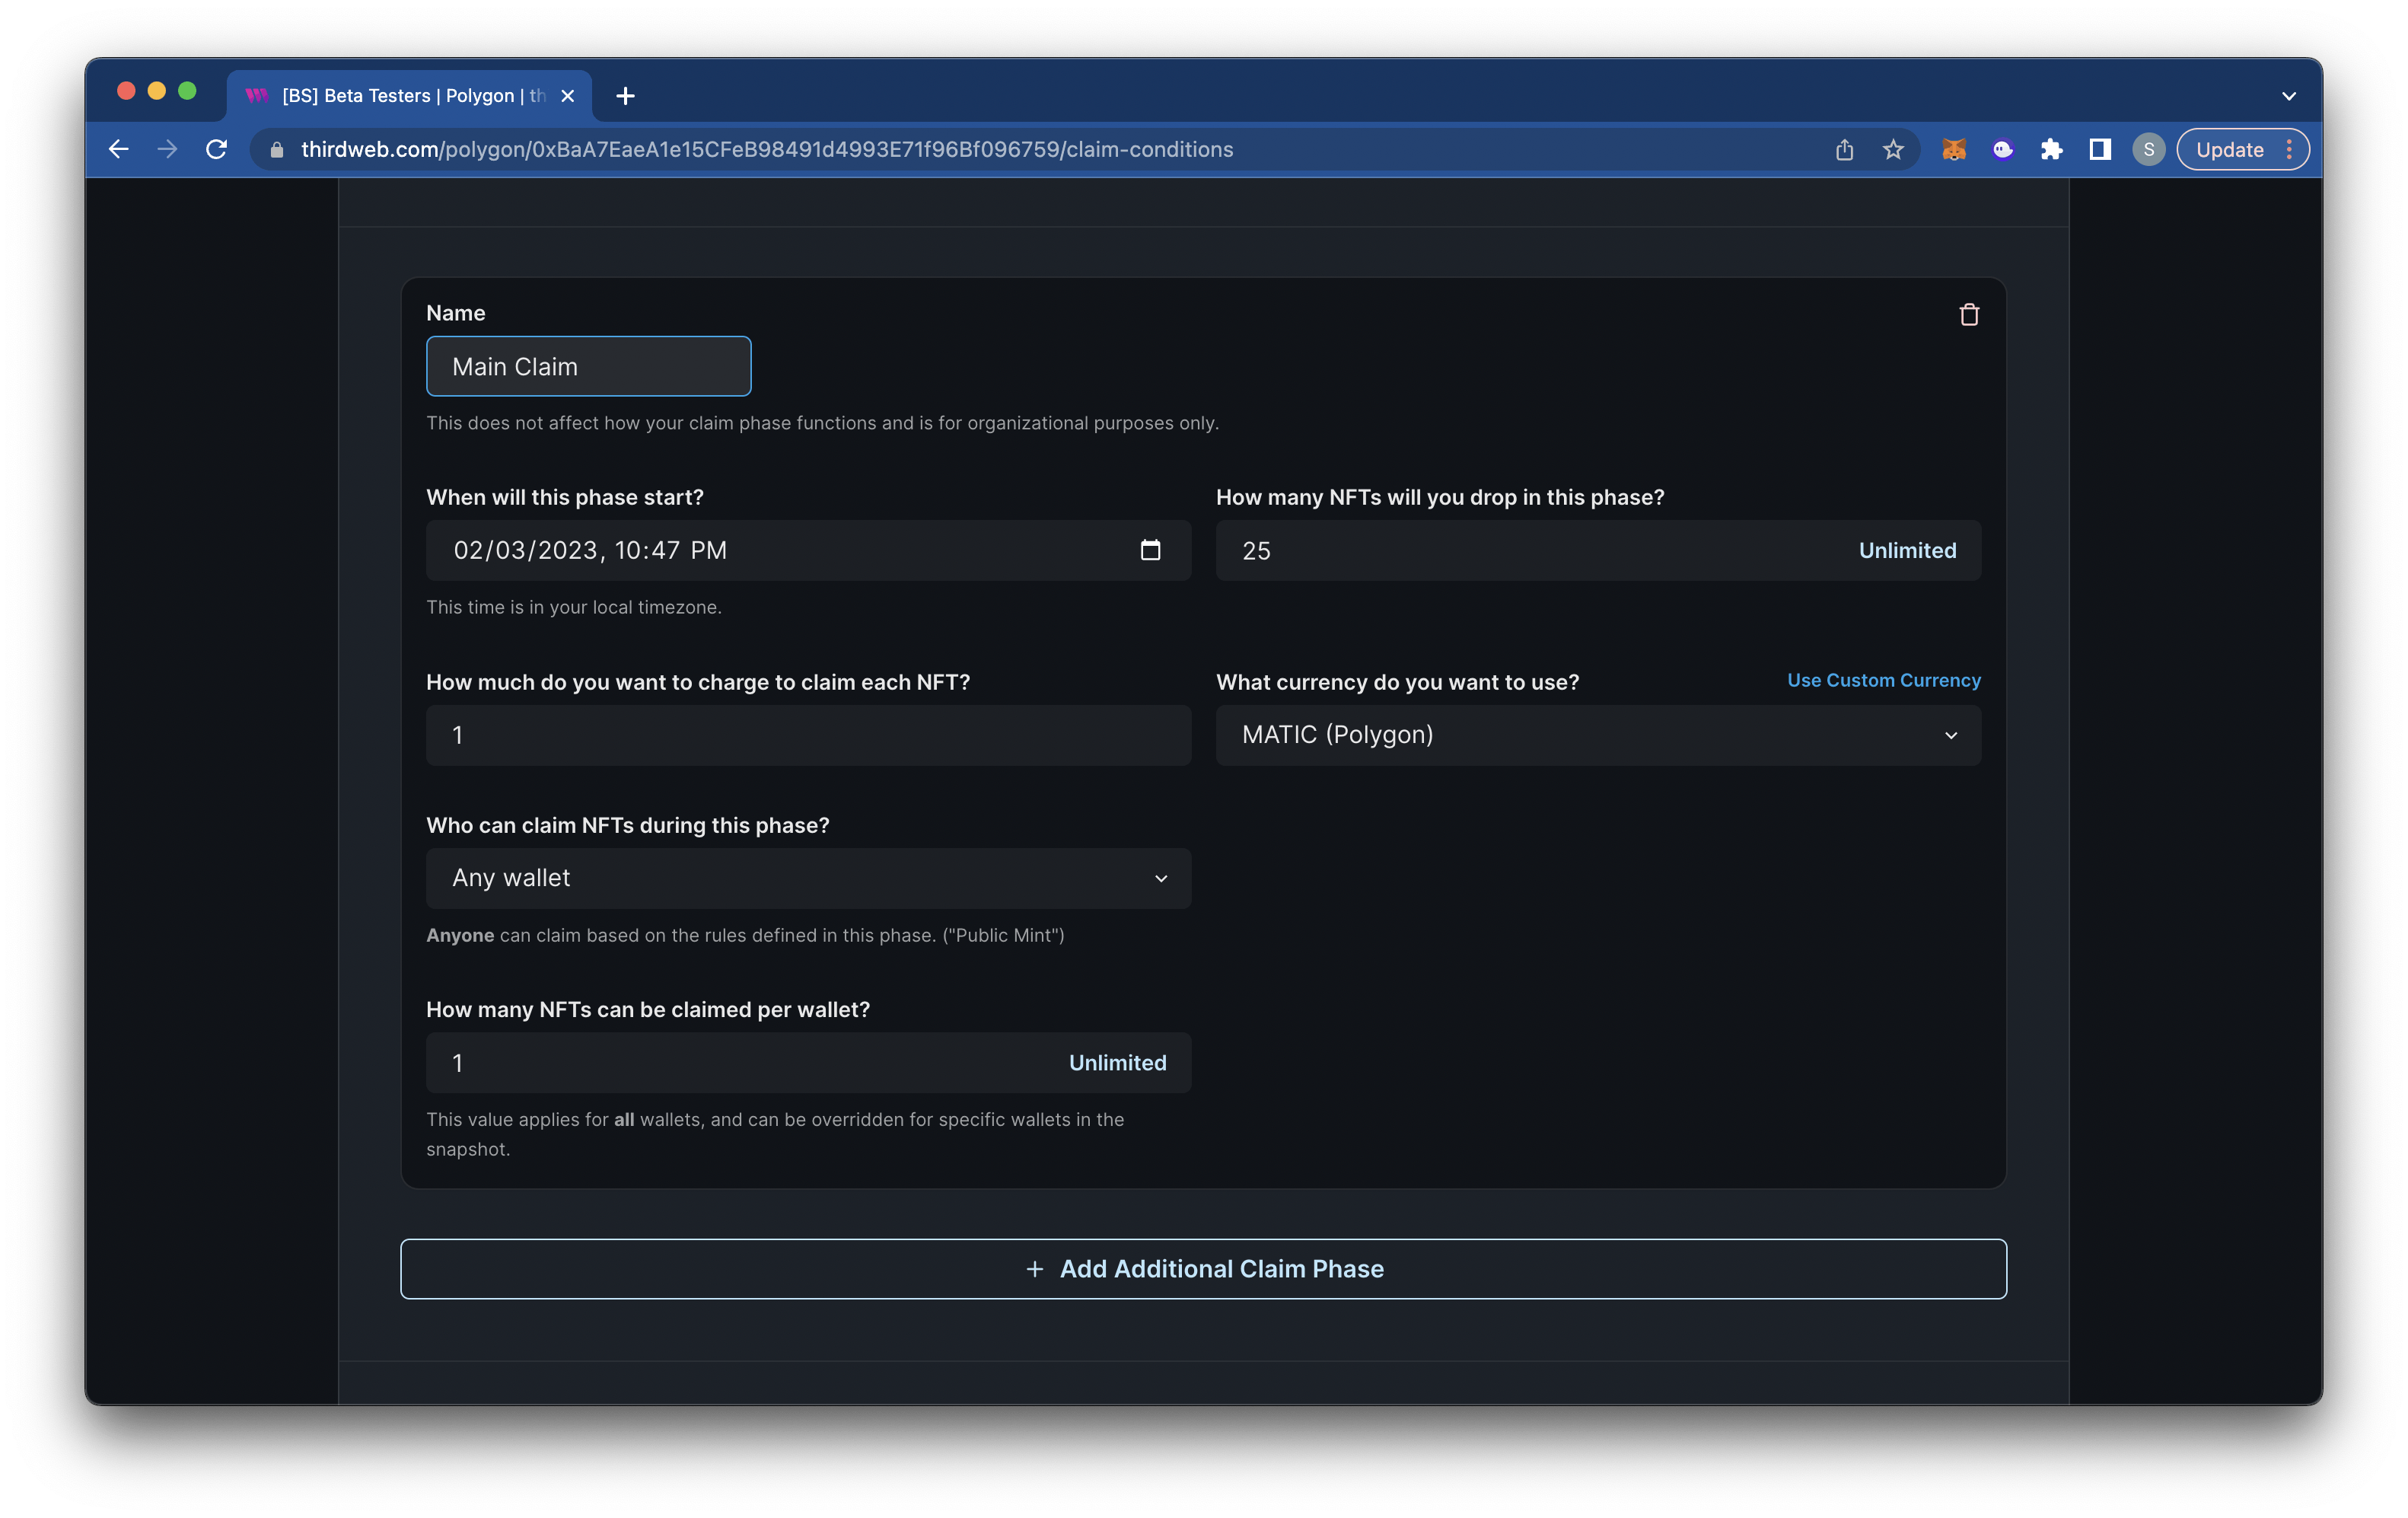
Once all your NFTs are uploaded go over to the “Claim Conditions” tab of your dashboard.
Here you will set up your claim conditions for your drop. Start by selecting “Add Initial Claim Phase”.
Fill out the following:
Name: Name of the phase to distinguish from other phases if you create multiple.
Start time: By default the claim phase will start immediately.
Amount of NFTs to drop in phase: If you are doing an allowlist or special pricing for a certain amount you can specify that here. If you are releasing your whole collection in 1 phase then this will be the amount of your collection. *For this collection there are 25 NFTs so 25 will be the amount dropped.
Price for drop: Provide a price, if any, for a single NFT and in what currency they will pay (by default this is the token of the chain you deployed on, but you can select any token within that chain).
Who can claim: Specify which wallets can claim an NFT in the drop.
Amount per wallet: Specify how many NFTs a wallet can claim from the drop
Select “Save Claim Phase” and confirm the transaction in your wallet.
Your NFT smart contract is now complete and your NFTs are ready to be claimed. To make everything easier to claim let’s now go ahead and create a minting website for a better claiming experience.
Minting Website
To create our minting website we’re going to be using Makeswift and deploying it using Vercel. Makeswift has a Thirdweb template that we can use to create a quick and easy minting site.
- First head over to this repo and scroll down and select “Deploy”.
This will bring you to Vercel where you will need to login with a GitHub account.
Create a Git repository. Give a name to your repo then select “Create”.
Add the Makeswift integration.
Sign in or create a Makeswift account.
Make sure “Create New Site” is selected and select “Continue”
Now Vercel will build and deploy your minting website (this may take a couple minutes)

Once deployed you will be redirected to Makeswift and be brought to the editor for the website.
Select the box element that holds the demo NFT mint information. On the right tool section you will now see the option to select “Chain” and fill a “Contract Address”
Select the chain that you deployed your NFT to (for this NFT we used Polygon)
Copy the contract address of your NFT address from your Thirdweb dashboard
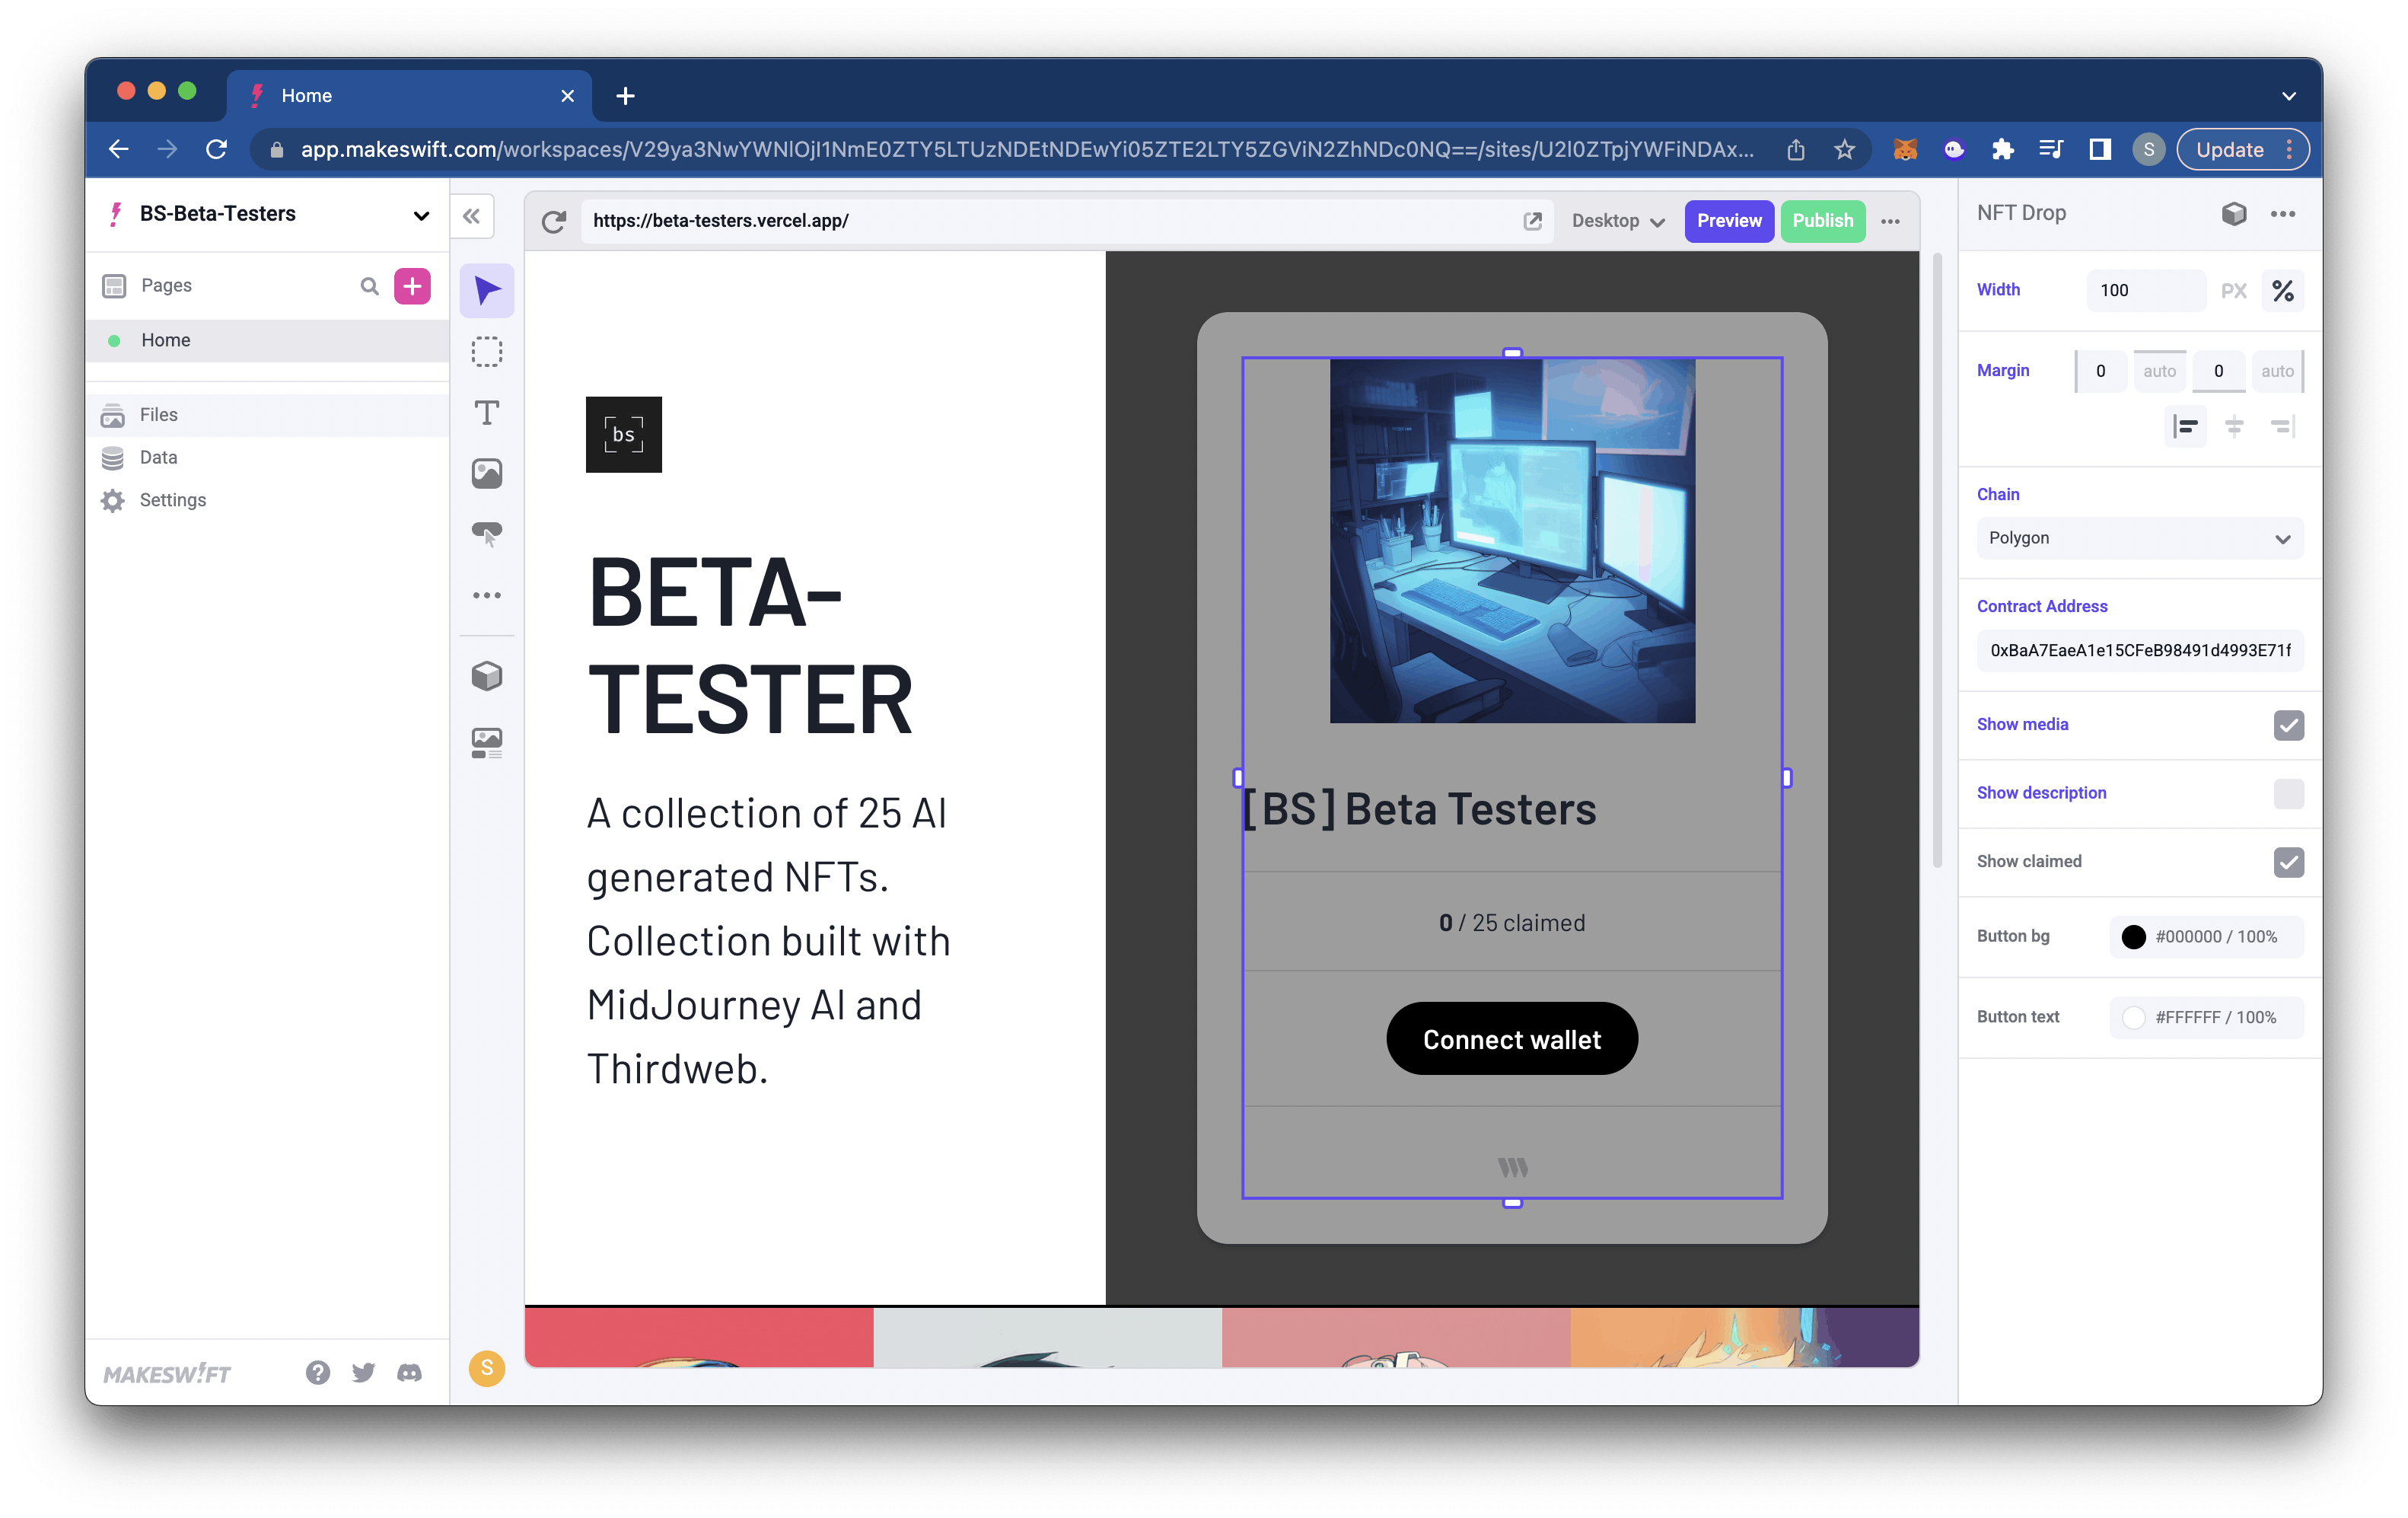
You should now have your NFT collection showing instead of the demo collection. You can also change the information on the website simply by selecting the text and editing. On the left-side bar you have different tools to add different components to your website and can design it how you like.
Once you are satisfied with your website go ahead and select ‘Publish’ in the top-right. You’ll be given a URL you can then share and sell your NFTs with.
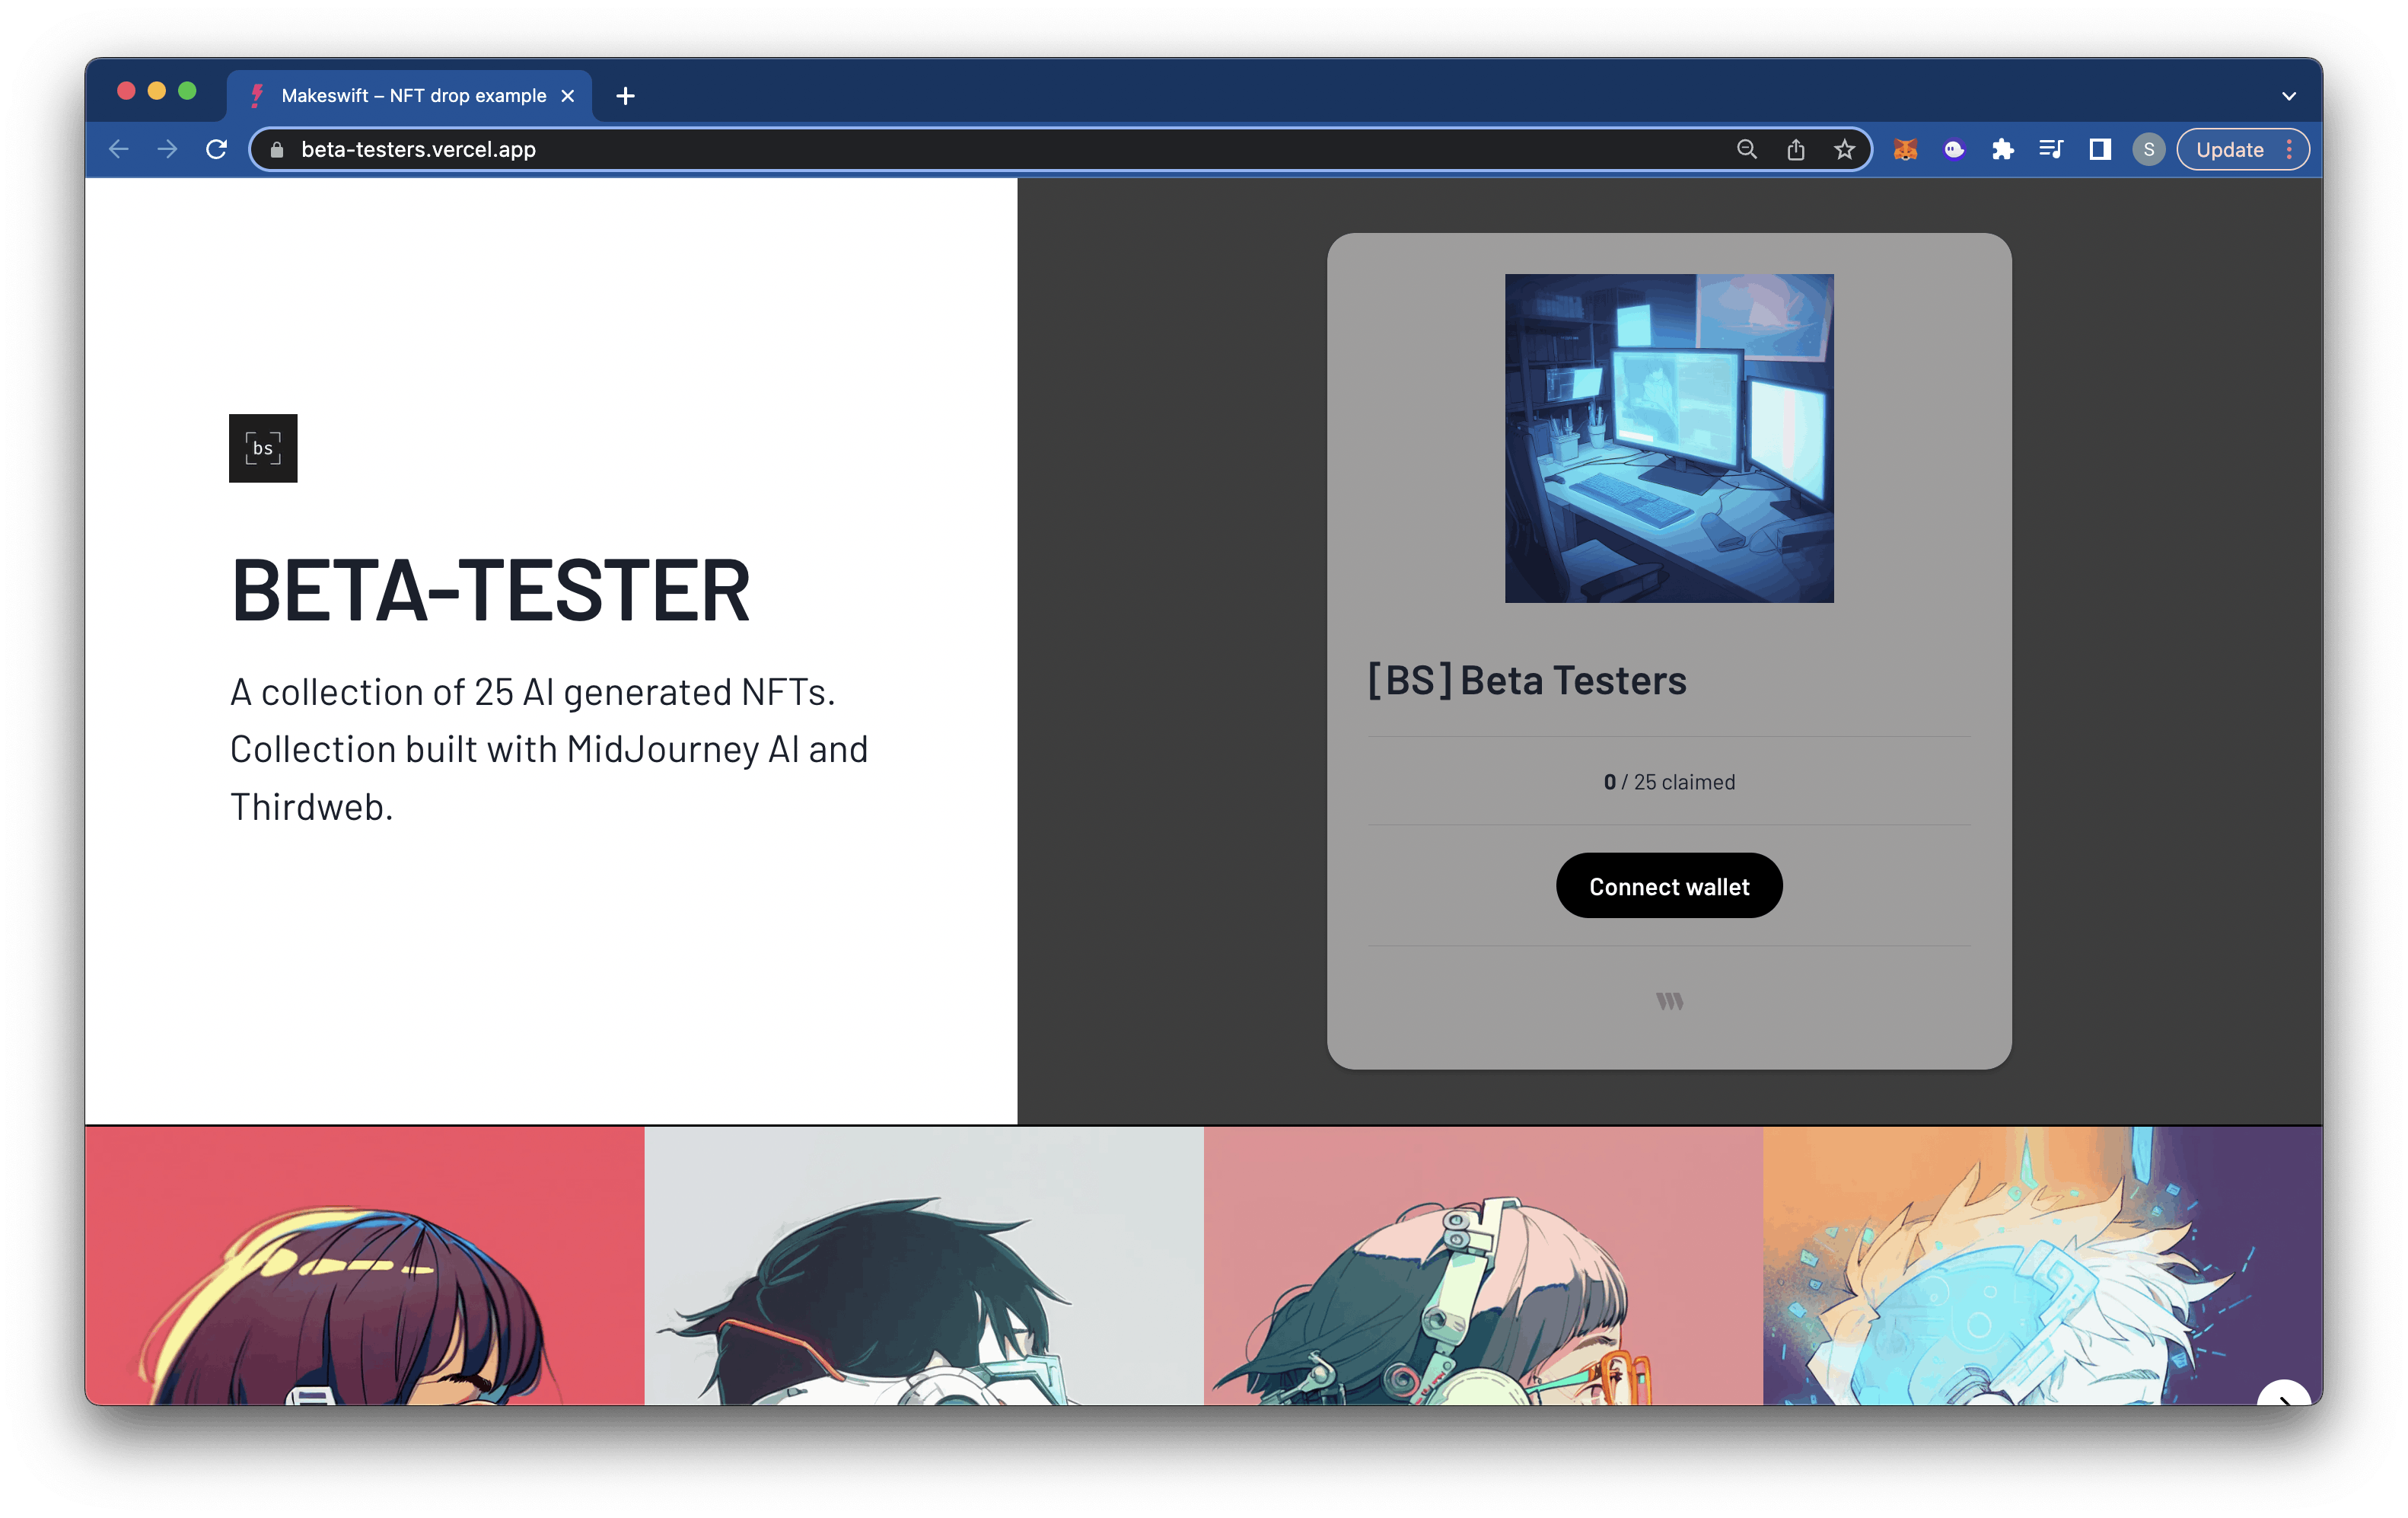
Collect a [BS] BETA-TESTER
There are only 25 in this collection and costs 1 MATIC.